DevOps with Jenkins Part-2
In the last session "DevOps with Jenkins" we know
- What is Jenkins
- How to Install & Configure Jenkins
- How to Integrate GitHub with Jenkins.
In this session we will cover
- How to Create Builds with Jenkins
- How to Create Users & Manage Permissions in Jenkins
- How to Set-up Jenkins Master/Slave
Create Builds with Jenkins Freestyle Project:
Jenkins freestyle project:
A Jenkins project is a repeatable build job which contains steps and post-build actions. The types of actions you can perform in a build step or post-build action are quite limited. There are many standard plugins available within a Jenkins freestyle project to help you overcome this problem. They allow you to configure build triggers and offers project-based security for your Jenkins project.
Creating a Freestyle Build Job:
The freestyle build job is a highly flexible and easy-to-use option. You can use it for any type of project; it is easy to set up, and many of its options appear in other build jobs.
Step 1) To create a Jenkins freestyle job, log on to your Jenkins dashboard by visiting your Jenkins installation path. Usually, it will be hosted on localhost at http://localhost:8080 If you have installed Jenkins in another path, use the appropriate URL to access your dashboard.

Step 2) Click on "New Item" at the top left-hand side of your dashboard.

Step 3) In the next screen,
1. Enter the name of the item you want to create. We shall use the "Hello world" for this demo.
2. Select Freestyle project
3. Click Okay

Step 4) Enter the details of the project you want to test.
Step 5) Under Source Code Management, Enter your repository URL. Assume We have a test repository located at https://github.com/nihartest/firstJava.git

It is also possible for you to use a local repository.
If your GitHub repository is private, Jenkins will first validate your login credentials with GitHub and only then pull the source code from your GitHub repository.
Step 6) Now that you have provided all the details, it's time to build the code. Tweak the settings under the build section to build the code at the time you want. You can even schedule the build to happen periodically, at set times.
Under build,
1. Click on "Add build step"
2. Click on "Execute Windows batch command" and add the commands you want to execute during the build process.

Here, We have added the java commands to compile the java code.
We have added the following windows commands:
javac HelloWorld.java
java HelloWorld

Step 7) When you have entered all the data,
1. Click Apply
2. Save the project.
Step 8) Now, in the main screen, Click the Build Now button on the left-hand side to build the source code.


Role Strategy Plugin:
Generally, in a large organization, there are multiple, separate teams to manage and run jobs in Jenkins. But managing this crowd of users and assigning roles to them can prove troublesome.
By default, Jenkins comes with very basic user creation options. You can create multiple users but can only assign the same roles and privileges to them. This not ideal, especially for a large organization.
The Role Strategy Plugin allows you to assign different roles and privileges to different users. You will first need to install the plugin in your Jenkins environment.
In this session, we will learn
- How to Create/Add a User
- Install Role Strategy Plugin
- Create Roles
- Assign a Role
- Project Roles
Step 1) Login to your Jenkins dashboard by visiting http://localhost:8080/
If you haven't installed Jenkins in your local server, go to the appropriate URL and access your dashboard by using your login credentials.

Step 3)
- Under Manage Jenkins, Click Create User
- Enter User details like password, name, email etc.
- Click Create User

Step 4) User is created

Install Role Strategy Plugin:
There are two methods for installing plugins in Jenkins:
- Installing it through your Jenkins dashboard
- Downloading the plugin from Jenkins website and installing it manually.
Step 1)
1. Go to Manage Jenkins
2. Click on the Manage Plugins option

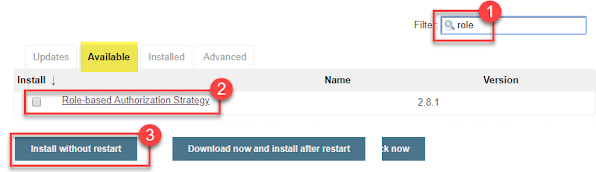
Step 2)
1. In available section, screen Search for "role".
2. Select Role-based Authorization Strategy plugin
3. Click on "Install without restart" (make sure you have an active internet connection)
Step 3)
Once the plugin is installed, a "success" status will be displayed.

Step 4) Go to Manage Jenkins -> Configure Global Security -> Under Authorization, select Role Based Strategy. Click on Save.

In this step, we shall learn to certain roles to a single user or a group of users.
Step 1)
1. Go to Manage Jenkins
2. Select Manage and Assign Roles

Note: that the Manage and Assign Roles option will only be visible if you've installed the role strategy plugin.
Step 2) Click on Manage Roles to add new roles based on your organization.

Step 3) To create a new role called "developer",
1. Type "developer" under "role".
2. Click on "Add" to create a new role.
3. Now, select the permissions you want to assign to the "Developer" role.
4. Click Save

Assign a Role:
Step 1) Now that you have created roles, let us assign them to specific users.
1. Go to Manage Jenkins
2. Select Manage and Assign Roles

Step 2) We shall add the new role "developer" to user "user1"
1. Selector developer role checkbox
2. Click Save

Project Roles:
You can create project specific roles under Project Roles.
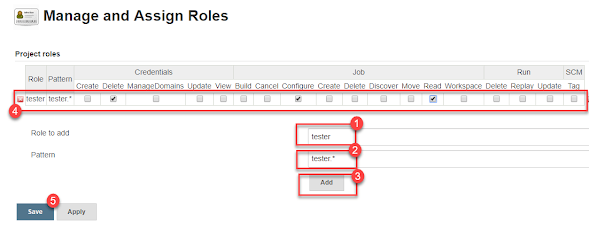
Step 1) In Manage and Assign Roles
1. Enter a role as "tester"
2. Add a pattern to this by adding tester.*, so that any username starting with "tester" will be assigned the project roles you specify.
3. Click Add
4. Select privileges
5. Click Save
Setup Slaves on Jenkins:
There are two ways of authentication for setting up the Jenkins slaves.
- Using username and password
- Using ssh keys.
Jenkins Slave Prerequisites:
You need to do the following in the slave machines before adding it to the master.
- Java should be installed on your slave machine.
- We should have a valid user who can perform the required tasks on the server. (preferably a sudo user if your job required elevated privileges)
Create a Jenkins User:
It is recommended to execute all Jenkins jobs as jenkins user on the slave nodes.
Note: we are using Ubuntu machine as a slave. The steps will be same for other Linux flavours as well
1. Create a jenkins user and a password using the following command.
- sudo adduser jenkins --shell /bin/bash
Type a password when prompted. The above commands should create a user and a home directory named jenkins under “/home”.
- Now, login as jenkins user.
su jenkins
- Create a “jenkins_slave” directory under /home/jenkins.
Mkdir /home/jenkins/jenkins_slave
Setting up Jenkins slaves using username and password:
- Head over to Jenkins dashboard –> Manage Jenkins –> Manage Nodes
- Select new node option.

- Give it a name, select the “permanent agent” option and click ok.

- Enter the details as shown in the image below and save it. For credential box, click the add button and enter the slaves jenkins username and password (For logging into the slave machine) that you created during the slave configuration. To know what each option means, click the question mark at the right side of each text box.

- Once you click save, Jenkins will automatically connect to the slave machine and will configure an agent.
- Note : Ensure SSH is running all machines
Following can help you verify and install, open up ssh if not present already.
sudo systemctl status ssh
sudo apt-get install openssh-server
sudo systemctl status ssh
sudo ufw allow ssh
Like this, you can add multiple nodes as slaves.
Setting up Jenkins slaves using ssh keys:
- Login to the slave server as a jenkins user.
- Create a .ssh directory and cd into the directory.
mkdir ~/.ssh && cd ~/.ssh
- Create an ssh key pair using the following command. Press enter for all the defaults when prompted.
ssh-keygen -t rsa -C "The access key for Jenkins slaves"
- Add the public to authorized_keys file using the following command.
cat id_rsa.pub > ~/.ssh/authorized_keys
- Now, copy the contents of the private key to the clipboard.
cat id_rsa
Add the private key to Jenkins credential list:
1. Go to jenkins dashboard –> credentials –> Global credentials –> add credentials , select and enter all the credentials as shown below and click ok.

Setup slaves from Jenkins master:
1. Follow the first 3 steps we did for slave configuration using username and password.
2. Follow all the configuration in the 4th step. But this time, for the launch method, select the credential you created with the ssh key.
Test the slaves:
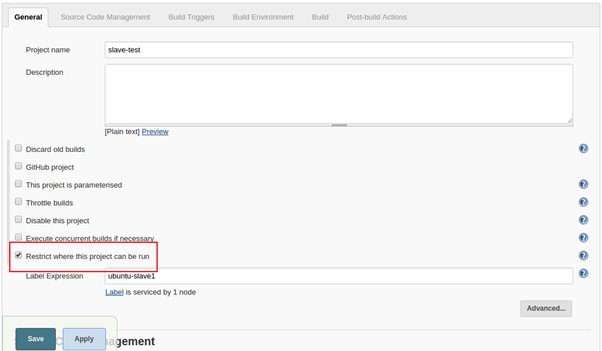
To test the slave, create a sample project and select the option as shown below. You need to select the node using the label option. If you start to type the letter the node list will show up.
Comments
Post a Comment